tháng 11 2019


Hướng dẫn sử dụng ForFiles để xóa các tệp cũ hơn N ngày trên Windows 10

Cách 1: Sử dụng ForFiles để xóa các tệp cũ hơn N ngày trên Windows 10:

  • Mở CMD với quyền admin
  • Gõ lệnh: ForFiles / p "C: \ path1\path2\pathN" / s / d -10 / c "cmd / c del @file"

  • / p - cho biết tên đường dẫn để bắt đầu tìm kiếm.
  • / s - hướng dẫn ForFiles tìm kiếm bên trong các thư mục con.
  • / d - chỉ định ngày sửa đổi cuối cùng cho một tệp.
  • / c - hướng dẫn ForFiles thực thi lệnh, cần được gói trong dấu ngoặc kép, mặc định là mật mã cmd / c del @file .

Cách 2: Sử dụng Task Scheduler để tự động xóa các tệp cũ hơn N ngày trên Windows 10
  1. pen Start.
  2. Search for Task Scheduler and click the top result to open the experience.
  3. Right-click the Task Scheduler Library folder.
  4. Click the New Folder option.
  5. Type any name for the folder and click OK. (We’re creating a new folder to keep tasks organized and separated from the system tasks.)
  6. Right-click the recently created folder, and select the Create Task option.
  7. In the “Name” box, enter a name for the task.
  8. In the “General” tab, under the “Security options” section, select the Run whether user is logged on or not option. (This is the option that will make the command window not to appear when the task runs automatically.)
  9. Thẻ lập lịch tác vụ
  10. Task Scheduler General tab
  11. Clear the Do not store password option.
  12. Click the “Triggers” tab, and click the New button.
  13. Using the “Begin the task” drop-down menu, select the On a schedule option.
  14. Under “Settings,” specify when you want the task to run (e.g., On time, Daily, Weekly, Monthly). Whatever option you select, make sure to specify the Start settings on the right side.
  15. Click the OK button.
  16. Cài đặt trình lập lịch tác vụ
  17. Task Scheduler Trigger settings
  18. Click the “Actions” tab, and click the New Button.
  19. Using the “Actions” drop-down menu, select the Start a program option.
  20. In the “Program/script” box, type the following command:
  21. ForFiles
  22. In the “Add arguments” box, type the following command and click the OK button.
  23. /p "C:\path\to\folder" /s /d -30 /c "cmd /c del @file"
  24. In the above command remember to change "C:\path\to\folder" specifying the path to the folder that you want to delete files, and change /d -30 to select files with a last modified date.
  25. Lập lịch tác vụ Cài đặt hành động
  26. Task Scheduler Action settings
  27. Click the “Settings” tab, and make sure to check the following options:
  28. Allow task to be run on demand.
  29. Run task as soon as possible after a scheduled start missed.
  30. If the task fails, restart every.
  31. Click the OK button.
  32. Task Scheduler additional settings
  33. If prompted, enter your administrative username and password.
  34. Click the OK button.

Windows 10 default environment variables

windows 10 variables


VARIABLE WINDOWS 10
%ALLUSERSPROFILE% C:\ProgramData
%APPDATA% C:\Users\{username}\AppData\Roaming
%COMMONPROGRAMFILES% C:\Program Files\Common Files
%COMMONPROGRAMFILES(x86)% C:\Program Files (x86)\Common Files
%CommonProgramW6432% C:\Program Files\Common Files
%COMSPEC% C:\Windows\System32\cmd.exe
%HOMEDRIVE% C:\
%HOMEPATH% C:\Users\{username}
%LOCALAPPDATA% C:\Users\{username}\AppData\Local
%LOGONSERVER% \\{domain_logon_server}
%PATH% C:\Windows\system32;C:\Windows;C:\Windows\System32\Wbem
%PathExt% .com;.exe;.bat;.cmd;.vbs;.vbe;.js;.jse;.wsf;.wsh;.msc
%PROGRAMDATA% C:\ProgramData
%PROGRAMFILES% C:\Program Files
%ProgramW6432% C:\Program Files
%PROGRAMFILES(X86)% C:\Program Files (x86)
%PROMPT% $P$G
%SystemDrive% C:
%SystemRoot% C:\Windows
%TEMP% C:\Users\{username}\AppData\Local\Temp
%TMP% C:\Users\{username}\AppData\Local\Temp
%USERDOMAIN% Userdomain associated with current user.
%USERDOMAIN_ROAMINGPROFILE% Userdomain associated with roaming profile.
%USERNAME% {username}
%USERPROFILE% C:\Users\{username}
%WINDIR% C:\Windows
%PUBLIC% C:\Users\Public
%PSModulePath% %SystemRoot%\system32\WindowsPowerShell\v1.0\Modules\
%OneDrive% C:\Users\{username}\OneDrive
%DriverData% C:\Windows\System32\Drivers\DriverData
%CD% Outputs current directory path. (Command Prompt.)
%CMDCMDLINE% Outputs command line used to launch current Command Prompt session. (Command Prompt.)
%CMDEXTVERSION% Outputs the number of current command processor extensions. (Command Prompt.)
%COMPUTERNAME% Outputs the system name.
%DATE% Outputs current date. (Command Prompt.)
%TIME% Outputs time. (Command Prompt.)
%ERRORLEVEL% Outputs the number of defining exit status of previous command. (Command Prompt.)
%PROCESSOR_IDENTIFIER% Outputs processor identifier.
%PROCESSOR_LEVEL% Outputs processor level.
%PROCESSOR_REVISION% Outputs processor revision.
%NUMBER_OF_PROCESSORS% Outputs the number of physical and virtual cores.
%RANDOM% Outputs random number from 0 through 32767.
%OS% Windows_NT
Although you can use environment variables to quickly access certain locations within Windows 10, you’ll typically use these variable when building an script or an application.

Keep in mind that some of the variables mentioned are not location specific, including %COMPUTERNAME%, %PATHEXT%, %PROMPT%, %USERDOMAIN%, %USERNAME%.

Hướng dẫn Reset khi quên password Windows 10 v1903 

reset password windows 10

Tạo một ổ Bootable Media có chứa cài đặt Windows 10. Ngoài ra bạn phải sử dụng đĩa cài đặt Windows thích hợp 32-bit hoặc 64-bit, điều này phụ thuộc vào phiên bản Windows bạn đã cài đặt. Sau đó thực hiện các bước sau:

1. Khởi động từ ổ USB cài đặt Windows.

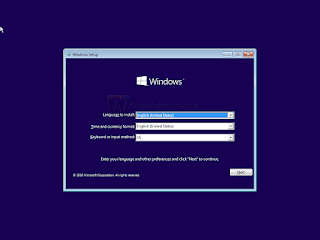
2. Chờ cho đến khi màn hình Windows Setup xuất hiện:

3. Nhấn tổ hợp phím Shift + F10 để mở cửa sổ Command Prompt.

4. Trên cửa sổ Command Prompt bạn nhập regedit vào đó rồi nhấn Enter để mở Registry Editor.


5. Trên cửa sổ Registry Editor bạn tìm key HKEY_LOCAL_MACHINE ở danh sách khung bên trái.

Sau khi đã chọn xong key, trên Menu lệnh bạn chọn File => Load Hive...

chọn File => Load Hive...

6. Tiếp theo trên hộp thoại Load Hive bạn chọn file:

DRIVE:\Windows\System32\config\SYSTEM

Lưu ý:

Thay thế DRIVE bằng tên ổ bạn cài đặt Windows, thường là ổ C.

7. Nhập bất kỳ một tên nào mà bạn muốn cho Hive mà bạn đang load. Chẳng hạn như 123.

8. Điều hướng theo key:

HKEY_LOCAL_MACHINE\123\Setup

Đường dẫn

Chỉnh sửa thông số cmdline và thiết lập là cmd.exe. 

Thay đổi giá trị thông số SetupType DWORD thành 2.

9. Tiếp theo trên cửa sổ Registry, chọn key 123 ở danh sách khung bên trái rồi chọn File => Unload hive.

Đóng Registry Editor và tất cả các cửa sổ đang mở lại

Lúc này máy tính Windows 10 của bạn sẽ được khởi động lại.

10. Rút ổ USB và khởi động máy tính trực tiếp từ ổ cứng. Lúc này màn hình sẽ giống như hình dưới đây:

 Rút ổ USB và khởi động máy tính trực tiếp từ ổ cứng

11. Nhập câu lệnh dưới đây vào cửa sổ Command Propmt:

net user

Trên màn hình sẽ hiển thị tất cả các tài khoản đang tồn tại trên máy tính của bạn.

12. Để thiết lập mật khẩu mới cho tài khoản Windows của bạn, nhập câu lệnh dưới đây vào cửa sổ Command Propmt:

net user "your username" "new password"

13. Nhập tiếp regedit để mở Registry Editor.

14. Trên cửa sổ Registry bạn điều hướng theo key:

HKEY_LOCAL_MACHINE\System\Setup

Chỉnh sửa thông số cmdline và thiết lập giá trị trống.

Thay đổi giá trị thông số SetupType DWORD là 0.


15. Đóng cửa sổ Registry Editor và cửa sổ Command Prompt lại để tiếp tục.

Đóng cửa sổ Registry Editor và cửa sổ Command Prompt lại


Lúc này Windows 10 sẽ khởi động lại. Sau khi quá trình khởi động kết thúc, bạn có thể sử dụng mật khẩu mà bạn vừa thiết lập để đăng nhập máy tính Windows 10.

CCNA

CẤU HÌNH CƠ BẢN

1. Router>: User exec mode

Các lệnh cơ bản:
o Show version
o Show privilege
o Show flash

2. Router#: Privileged exec mode

o Enable/disable
o Show running-config (Gõ show run ->Tab tự hiện hết câu lệnh): xem các lệnh cấu hình
o Nhấn phím bất kỳ kết thúc dòng More… của lệnh
o Show startup-config: lệnh xem startup config
o Write/copy run startup-config (Xài 1 trong 2 lệnh để chép file startup config vào router)
o Write erase/erase start
o Reload: chạy lại
o Phím tăt: Ctrl +a đầu dòng
o Ctrl + E : cuối dòng
o Ctrl + D: delete ký tự bên phải
o Ctrl Shift 6 : dừng dòng lệnh lỗi
o Ctrl Z: về mode 2

3. Router(Config)#: Global configuration Exec Mode

o Config terminal: vào mode
o Exit: thoát mode, hoặc Ctrl Z
o Hostname Router1 : lệnh đặt tên Router là Router1
o Banner motd # Gõ lời chào # <-|
o Banner motd # <-|
********************
****ABCDBJJBJH******
********************
<-| #
o Enable password 123456 : đặt password cho mode 2 không mã hóa
o Gõ No enable password: xóa pass
o Enable secret 123456 : đặt pass mã hóa
o No ip domain-lookup: xóa phân giải tên khi Router ko hiểu, khỏi nhấn phím tắt Ctrl Shift 6
o No logging console: xóa thông báo gởi đến console port

4. Sub-mode

4.1 Console:

o Line console 0 1 (Chỉnh cổng 0 và 1, nếu chỉ có 1 cổng chỉ gõ 0)
o Exit: thoát ra và vào chế độ config t Mode 3
o End: thoát ra và vào chế độ Priviledge Mode 2
o Password 123456 enter và login rồi enter là một bộ lệnh đặt pass và yêu cầu login từ mode 1 khi muốn vào cổng console của Router
o Exec-timeout 0 20: thoát sau o phút 20 giây
o Exec-timeout 0   0: không tự logout
o Logging synchronous: chống trôi dòng lệnh đang gõ khi bị hiện thông báo

4.2 AUX: Toàn bộ lệnh giống console

4.3 Interface:

o Fixed: Các cổng cố định có các Type: Ethernet, Fast Ethernet, Gigabit Ethernet,…
  • Type port

o Module: Các cổng option gắn thêm
  • Type slot/port
  • Type slot/subslot/port


o Show ip interface brief : lệnh xem ip của interface sử dụng ở Mode 2
o Interface fastethernet 0/0: vào chế độ set cổng fastethernet 0/0
o No shutdown: lệnh mở cổng cho nó Up lên
o Ip add 192.168.15.101 255.255.255.0 : gán ip cho card inter hiện hành
o Sử dụng cho vLan của Swich or Router: (Để có thể Ping được)
o Interface vlan1: vào config vlan1
o No shutdown
o Ip add 192.168.15.102 255.255.255.0 : đặt ip cho vLan

4.4 VTY : Đặt password login và cho phép user kết nối đến router qua telnet

Line vty 0 1 đến 15 (Cho phép 1 đến15 user kết nối cùng thời điểm)
Password 456
login
Lệnh cho Telnet vào cổng HWIC-8A

Conf t
Line 0/0/0 0/0/7 : Cấu hình line 0/0/0 đến 0/0/7 1 lúc 8 line của HWIC-8A
No pass : không đặt pass
No login: không cần login
Transport input telnet: chuyển telnet đến HWIC-8A
Show line : xem các line ở Mode 2
Port của các Router = 2000 + số line
0/0/0 line 2 => port = 2002
0/0/7 line 9 => port =2009

Ngắt kết nối Telnet : Sau mỗi phiên kết nối phải clear rồi mới telnet lại được
  • Telnet 192.168.15.253
  • Enable
  • Clear line tty 2->9 : clear các line từ 2 đến 9, mỗi line 1 dòng


BẢO TRÌ MÁY TÍNH

CHUYÊN NGHIỆP VÀ UY TÍN {facebook#http://facebook.com/hethongmang.vn}

Biểu mẫu liên hệ

Tên

Email *

Thông báo *

Được tạo bởi Blogger.